FAQs
What is the difference between Lumens and Lux?
Why are my 2-way switch bulbs flickering?
How Does Dimming LED Bulbs Work?
- Low Voltage DC Dimming
- Mains AC Dimming
- Low Votlage Dimming from the Mains Side
- 230V Triac Dimmer Settings
I have replaced my halogen MR16 bulbs with LEDs and they are not operating properly. What can I do?
What does the SELV rating on my power supply mean?
Why is my indicator hyper-flashing?
What are error-free bulbs?
What about CAN bus (CANBUS) bulbs?
What is the difference between Lumens and Lux?
Lumens (luminous flux) is a measure of the total amount of visible light emitted by a source, regardless of how large or small an area it is spread over.
Illuminance (lux) is a measure of how much luminous flux (lumens) is spread over a given area and is therefore the intensity of illumination on a surface; one lux is equal to one lumen per square metre. A given amount of light will illuminate a surface more dimly if it is spread over a larger area (wider spread or further away), so illuminance is inversely proportional to area when the luminous flux is held constant.
For example: A flux of 1000 lumens, spread uniformly over an area of 1 square metre, lights up that square metre with an illuminance of 1000 lux. However, the same 1000 lumens spread out over 10 square metres produces an illuminance of only 100 lux.
Why are my 2-way switch bulbs flickering?
Depending on how a 2-way switch has been wired by the electrician, sometimes it can cause LED and CFL bulbs to briefly flicker every now and then while the switch is off. It may be anywhere from 10 to 30 seconds between flickers, and the flicker may not be very bright, but it is not ideal nonetheless. Our engineers have tested and reproduced this scenario and have come up with the cause and a very simple solution to the problem. View the full explanation and solution to this issue in a pdf here.
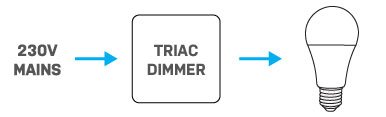
How Does Dimming LED Bulbs Work?
Most low voltage products can be dimmed, typically low power simple products such as strip light and G4 bulbs. However, some higher power LED products are produced with internal drivers and these are either designed to handle dimming or not – such as MR16 bulbs.
Dimming on the low voltage side (12V or 24V DC) requires a PWM dimmer installed between the power source (power supply or battery) and the load (LED product) where the power to the load is switched on and off very fast to control the brightness.
Options for PWM Dimmers can vary as there are ones that have remote controls, and ones that are wall-mounted with a knob or touch sensor. In most installations the power supply is left powered on all the time, even when the product is turned off via the dimmer. However, if power is switched on the mains side of the supply, most dimmer units will remember their last setting.

Most 230V AC LED products have an internal driver that must be capable of dimming in order for dimming to work. Mains powered products (such as downlights and GU10 bulbs) that are designed to be dimmed can be wired with a Triac dimmer (leading edge or trailing edge) such as the Kiwi Electronics, PDL or Clipsal dimmers.
Leading edge and trailing edge dimming works by modifying the voltage waveform (sine wave) to reduce the power delivered to the load. For LED products, the driver is designed to monitor the waveform and control the brightness of the LED accordingly. Also see 230V Triac Dimmer Settings for more information.
When a product that is not designed to be dimmed is used on a dimming circuit, the LEDs can flicker and appear unstable, and may not work at all when turned down. There is no fix for this – the product is not designed to be dimmed.
Low Voltage Dimming from the Mains Side
If you want to dim a low voltage product from the mains side, then you must also have a power supply that is triac‑dimmable as power supplies are not dimmable from the 230V side. LEDstuff has a range of triac-dimmable power supplies that can be dimmed using a standard 230V mains wall dimmer (such as a Kiwi Electronics dimmer) to dim low voltage products.

When dimming an LED product with a mains wall dimmer, a good quality dimmer will have the option to change the settings of the dimmer:
- It may have a minimum and maximum brightness setting – some LED products will dim well to 0% brightness (off), but some LED products will dim smoothly on the higher brightness, but may be a little unstable (flickering) at the lower end. When this happens you may want to set the minimum brightness to just above this level to prevent the flickering from occurring, or perhaps you want to set it so that it never turns off completely (0%). Also if you find a product too bright you may also want to lower the maximum brightness setting.
- It may also have a setting to change it from Trailing Edge dimming to Leading Edge dimming. LED products generally dim better on a dimmer set to Trailing Edge, so if your dimmer has this option you may want to check and see what it is set to.
I have replaced my halogen MR16 bulbs with LEDs and they are not operating properly. What can I do?
A large percentage of households in New Zealand have had 50W halogen MR16/GU10 bulbs installed over the last 20 years, either in the form of a spot light or a downlight, mainly because they were considered more efficient than traditional incandescent bulbs. In fact, the 50W halogen downlight was the bulb with the highest hours of use in New Zealand in 2006[1]. Additionally, low voltage MR16 halogens were preferred due to their increased efficiency and longer service life. This is despite MR16 halogen bulbs requiring an AC transformer to run the halogen from 12V alternating current.
However, the benefits were minimal, and with the advent of modern LED lighting technology, there is a large demand to now replace these halogen MR16 bulbs with LED equivalents offering a 10‑fold increase in both efficiency and lifespan.
In general, LED bulbs can directly replace an MR16 bulb with no fuss. However, in about 1‑in‑10 cases the halogen transformer is not compatible. This can result in one of the following situations:
- The AC transformer output is poorly regulated, resulting in the LED bulb flickering slightly. This can occur sometimes when the driver internal to the LED bulb is not capable of filtering the AC supply from the transformer. In this case, another LED bulb may operate better, however it is best to replace the transformer with a DC output power supply. We have a full range of power supplies, view them here.
- The AC transformer has been designed to cut‑off below a minimum load power. When an LED bulb is inserted, drawing much less power than the transformer is rated for, it will simply shut off the output. This typically occurs when a single bulb is powered from a transformer as opposed to 2 or 3 bulbs run from a single transformer. The solution here is to replace the transformer with a DC output power supply.
If you have any questions, please talk to our team about your situation and we can recommend a product that suits your application.
Note: If your halogen MR16 bulbs are dimmable from a leading edge or trailing edge dimmer, it is unlikely the LED bulbs can also be dimmed. This is because low voltage MR16 LED bulbs are not typically designed to be dimmed, and even when they are, there are often issues of compatibility with the transformer.
[1] LIGHTING IN NEW ZEALAND HOMES – lighting efficiency as a sustainability indicator, 2009, https://www.branz.co.nz/cms_show_download.php?id=04e6aad5be81dcf9fe6d844d2bca85ad46cbe3f9
What does the SELV rating on my power supply mean?
Safety (or separated) Extra Low Voltage is a type of circuit used to construct some constant voltage power supplies and constant current drivers, including our MEAN WELL ranges. Power supplies that meet this standard carry the “SELV” label and have a low risk of dangerous electrical shock. They must have the following two features:
- Electrical protective separation (i.e. double insulation, reinforced insulation or protective screening) from all other circuits other than SELV and PELV (Protected Extra Low Voltage) i.e. all circuits that might carry higher voltages.
- Simple separation from other SELV systems, from PELV systems, and from Earth (ground)
The safety of a SELV circuit is provided by:
- The extra-low voltage
- The low risk of accidental contact with a higher voltage
- The lack of a return path through earth (ground) that electric current could take in case of contact with a human body
The design of a SELV circuit typically involves an isolating transformer, and guaranteed minimum distances between conductors and electrical insulation barriers.
Why is my indicator hyper-flashing?
When you replace your incandescent indicator bulbs with efficient LED bulbs, your indicator can hyper-flash at a much faster rate. This usually means a bulb has blown; however, in this case it is due to the reduced current draw from the LED bulbs. In older model vehicles the flash rate is set by the load of the bulbs on the circuit – LED bulbs draw much less power than incandescent bulbs, and so the result is the flashing occurring at a higher rate; much like when the vehicle has had an incandescent indicator bulb blow. To fix this, you have a couple of options:
- You can replace your indicator relay to a fixed flash rate relay, so that it will flash at the same rate no matter what bulb is in place. LEDstuff stocks 2x models of replacement relay – one for Japanese model cars, and one for European model cars (however these will not suit all model vehicles – you will have to check and see if either of these will fit your vehicle).
- You can install a load resistor, which is installed across your indicator bulbs to simulate a normal load and return your indicator to a standard flash rate. A load resistor is used when replacing the indicator relay is impractical or if you cannot locate a suitable replacement relay.
What are error-free bulbs?
Some newer model vehicles have systems to detect when a bulb is blown and display an error on the vehicle instrument cluster. These systems work by measuring the current draw of the bulb and checking if it is below a set threshold, based on the normal power draw of the original incandescent bulb.
When an LED bulb is installed this can cause an ‘error’ to show because the power draw of the LED bulb is much lower. In most vehicles there is no way to disable the error and so to prevent it from being displayed the only option is to increase the current draw on the circuit to trick the vehicle's computer.
This is where ‘error-free’ bulbs come in. These are simply manufactured with built in resistors that add a dummy load to the circuit, resulting in an increased current draw in an attempt to be above this threshold. The problem is that different vehicle makes and models have different thresholds for different bulbs, and it is difficult to produce a bulb with a large dummy load due to power dissipation issues in smaller bulbs. This results in many cases with ‘error-free’ LED bulbs where, despite the bulb containing a dummy load, the current draw is still not above the threshold and so the vehicle still displays an error. The only solution is to increase the current draw even further by either trying a different bulb or installing a separate load resistor on the circuit.
What about CAN bus (CANBUS) bulbs?
Well, these are exactly the same as error-free bulbs. All modern vehicles contain a communication system called CAN bus that links the various modules throughout the vehicle. However, bulbs do NOT communicate with the CAN bus, and it is misleading to advertise it in this way.
In the majority of modern vehicles, the bulbs are powered by individual wires coming from the vehicle’s computer and so CAN bus has nothing to do with it. In some vehicles, the lighting circuits contain modules connected via CAN bus. In this case, the module measures the current through the bulb and reports back to the main computer via CAN bus.